Mold Generation

05
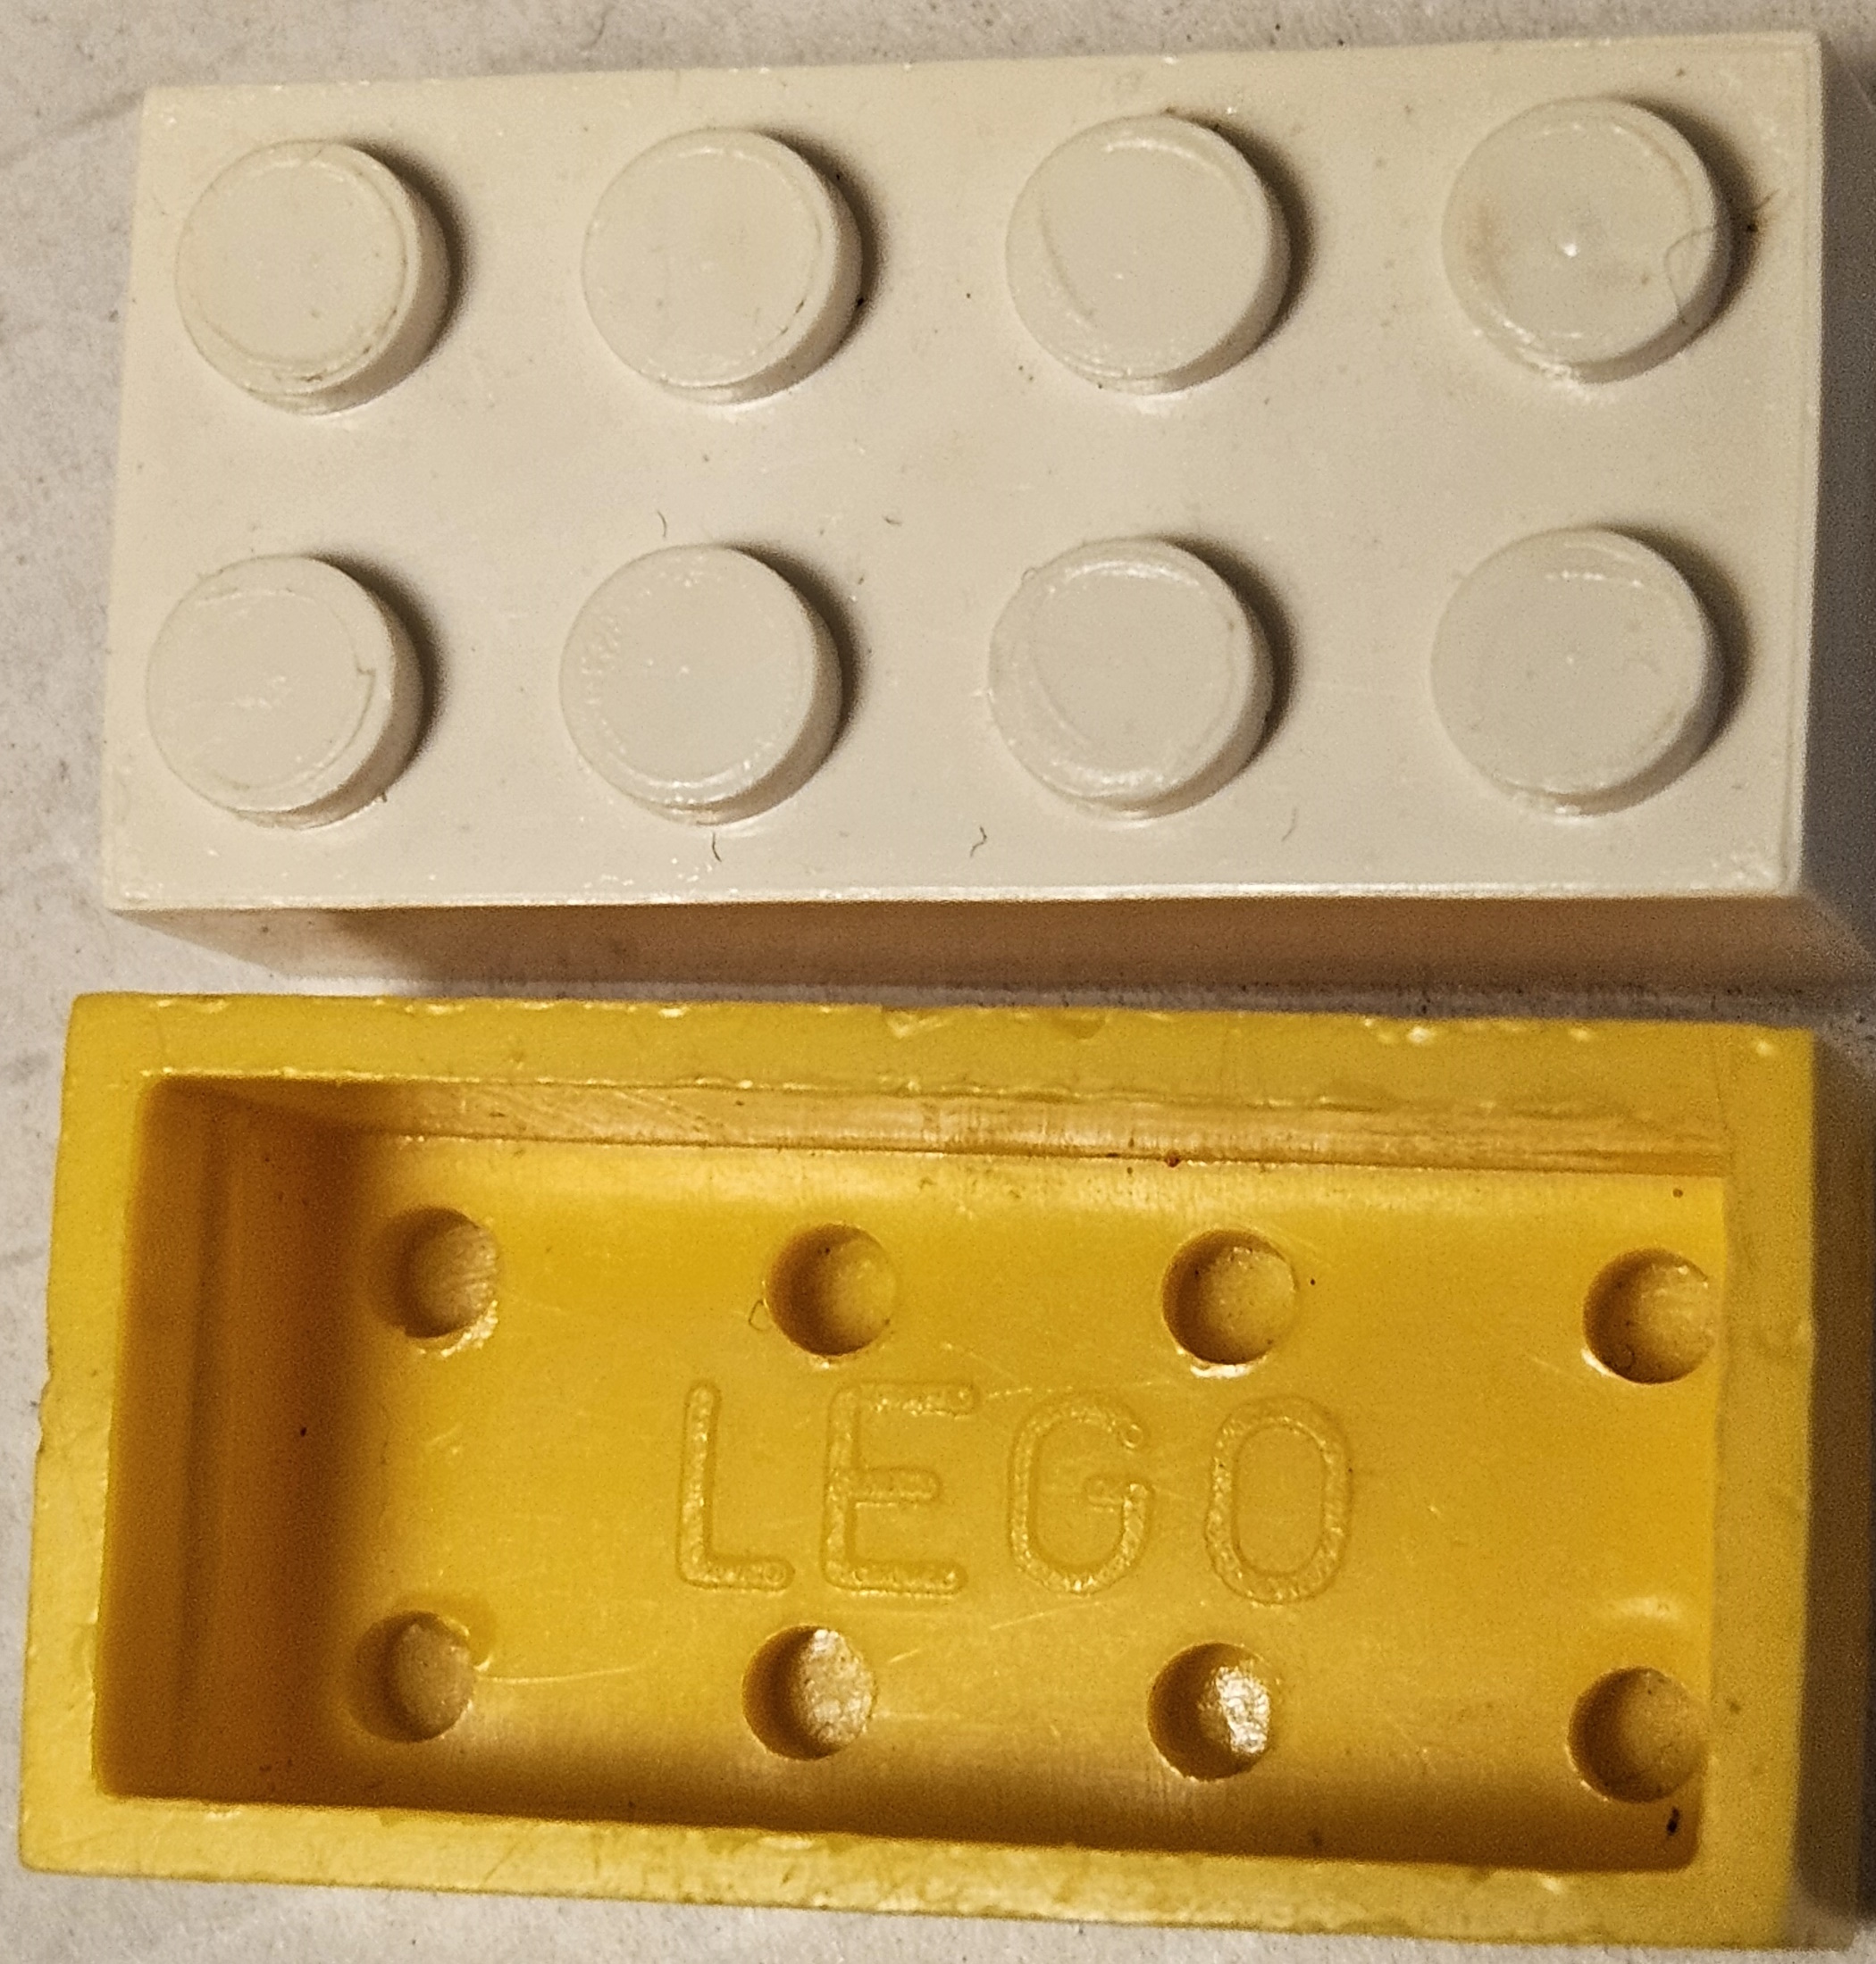
DescriptionTubeless - Logo inside
From1955
To1956
Molds View itemsPart Families View itemsPart Types View itemsColors View items
On mold-generation 5
The generation 5 mold only appears to be used in Norway and has a complex evolution through what is identified as 7 different iterations. There is strong evidence to support the following theory:
- The same bottom mold was being used for all 8 iterations (05a->05h).
- The mold consisted of 9 mold members:
| Pos. | Type |
|---|---|
| 1-4 | 2x4 |
| 5 | 2x3 |
| 6-7 | 2x2 |
| 8-9 | 1x2 |
- Four different top molds were being used throughout the lifetime of the mold, making it natural to divide the various iterations into four phases:
| Phase | Molds | Description |
|---|---|---|
| 1 | 05a - 05c | No logo on studs |
| 2 | 05d - 05e | Mix of both logo and no logo on studs |
| 3 | 05f - 05g | Logo on studs |
| 4 | 05h | Without slots – with logo on studs |
To identify the evolution of the mold a set of hypotheses have been used as a framework:
- Inside ribs were added to strengthen the bricks where slots where added, and not removed afterwards.
- The usage of the mold lasted long enough to end up with a slot-less version in the end.
- For each iteration, only a subset of colors where being produced.
- Bricks without stud-logo precedes bricks with stud-logo.
- There were produced bricks at a time when the mold contained mold members with and without stud-logo.
The combination of these hypotheses made it possible to draw a probable and quite plausible timeline for these bricks.
Mold position 1 [2x4]
Mold bottom:
From the third iteration (05c) the mold position is easily identifiable through a clear line extending through the “O” diagonally upwards to the right, but already from the second iteration (05b) a near vertical longer line can be seen to the right of the “O”. Tracking the origins of this mold position all the way back to the first iteration (05a) is a bit more complicated, since the first the vertical line mentioned above isn’t visible on all bricks from the first iteration. Three different variations of the first iteration have been identified, and only the last two variations have the vertical line visible.
From the fourth iteration (05d) a horizontal line extends from the bottom part of the “L”. During the fifth iteration (05e) the line evolves into a full set of lines extending from the “L”. When the sixth iteration (05f) comes, a lot of new lines are added to the bottom mold. Only the rib-spot top left separates bricks of the seventh iteration (05g) from the sixth, and the bottom mold is quite similar when we finally arrive at the latest iteration (05h) without slots.
Mold top:
The same top mold was used across the first three iterations (05a - 05c), easily identifiable by the stud patterns.
There are no signs of the top mold from the first three iterations being re-used for the next, indicating that a new top mold was created for the fourth and fifth iterations (05d-05e). What is remarkable, is that the top mold characteristics of the fourth iteration is recognizable on the second mold position of the fifth iteration: 2x4-05d-1 == 2x4-05e-2. This means that between the fourth and fifth iterations, two mold positions were swapped on the top mold (if the bottom mold was fixed) or the other way around.
The sixth and seventh iteration (05f-05g) of the mold shows signs of a new top mold being introduced. Bricks from these two iterations share a very identifiable mark in the top right corner.
This mark is not visible in the final iteration (05h), which again indicates that a new top mold was used.
Mold position 2 [2x4]
Mold bottom:
It’s first in the fourth iteration (05d) that the most prominent identifier is introduced for the second mold position. Then we se the introduction of the diagonal line going from the bottom left part of the “G”. On the same bricks, a much weaker set of lines going diagonally to the left of the fourth stud recess. These weak lines can be identified on bricks in the third iteration (05c) making a clear link between the first two phases. There are no clear markers on the mold bottom linking bricks from the first two iterations (05a - 05b) to the third (05c). Luckily, there are undisputable marks on the top mold making it possible to verify the bricks that belong to the second mold position.
The diagonal line below the “G” mention above works as a good identifier for bricks through all the later iterations (05e - 05h).
Mold top:
Within the first phase (05a - 05c) a large marker on the fourth stud makes it easy to identify bricks belonging to the second mold position.
There are no signs of the top mold from the first three iterations being re-used for the next, indicating that a new top mold was created for the fourth and fifth iterations (05d - 05e). What is remarkable, is that the top mold characteristics of the fourth iteration is recognizable on the first mold position of the fifth iteration: 2x4-05d-2 == 2x4-05e-1. This means that between the fourth and fifth iterations, two mold positions were swapped on the top mold (if the bottom mold was fixed) or the other way around.
The sixth and seventh iteration (05f - 05g) of the mold shows signs of a new top mold being introduced. Bricks from these two iterations share a weak mark in the top left corner.
This mark is not visible in the final iteration (05h), which again indicates that a new top mold was used.
Mold position 3 [2x4]
Mold bottom:
From the first iteration (05a) to the final iteration (05h) the same marker is present on all bricks. A rather long, nearly vertical line can be seen extending from the fifth stud, going upward.
Mold top:
The same top mold was used across the first three iterations (05a - 05c), easily identifiable by the stud patterns.
Similarly, the iterations in the second phase (05d - 04e) have the same markings, making it clear that the same top mold was being used for those iterations.
A short horizontal line between stud 4 and 8 makes bricks belonging to this mold position identifiable in the third phase (05f - 05g).
That marker is not evident in the final iteration.
Mold position 4 [2x4]
Mold bottom:
From the first iteration (05a) to the final iteration (05h) the same marker is present on all bricks. A diagonal line between the first and second stud confirms that the same bottom mold is being used across all the iterations.
Mold top:
The same top mold was used across the first three iterations (05a - 05c), identifiable by the stud patterns.
Similarly, the iterations in the second phase (05d - 04e) have the same markings (a clear mark to the right of stud 6), making it clear that the same top mold was being used for those iterations.
Long diagonal lines between studs 3, 4, 7 and 8 is a clear indicator for the iterations in the third phase (05f - 05g).
That marker is not evident in the final iteration.
Note: No samples found for the second iteration (05b).
Mold position 5 [2x3]
Mold bottom:
From the first iteration (05a) a line extending diagonally down from the “O” can be used as marker for the 2x3 bricks. That line is visible throughout all iterations (05a - 05h), but from the fourth iteration (05d) and onwards it is shadowed by a lot of other lines around the bottom surface.
Mold top:
The same top mold was used across the first three iterations (05a - 05c), identifiable by the stud patterns.
Similarly, the iterations in the second phase (05d - 04e) have similar markings (a line between stud 4 and 5), making it clear that the same top mold was being used for those iterations.
A set of thin horizontal lines below stud 6 is a clear indicator for the iterations in the third phase (05f - 05g).
Those lines are not evident in the final iteration.
Mold position 6 [2x2]
Mold bottom:
From the second iteration (05b) a clear mark above the “L” can be used as marker for this mold position. That mark is visible throughout all coming iterations (05b - 05h). When comparing bricks from the first and second iteration, a small vertical line to the left inside the third stud recess indicates that the first (05a) and second (05b) iterations are related.
Mold top:
The same top mold was used across the first three iterations (05a - 05c), identifiable by a small mark above stud 4.
Similarly, the iterations in the second phase (05d - 04e) have a short vertical line on the right side-wall, making it clear that the same top mold was being used for those iterations.
A set of marks in both bottom corners are clear indicators for the iterations in the third phase (05f - 05g).
Those marks are not evident in the final iteration.
Mold position 7 [2x2]
Mold bottom:
Across all iterations (05a - 05h) the same weak logo can be seen, indicating being the same bottom mold. From the fourth iteration (05d) until the final iteration (05h) a line extending downwards from the bottom right part of the “E”, further confirming this for those phases.
Mold top:
The same top mold was used across the first three iterations (05a - 05c), identifiable by a small mark between stud 2 and 4.
Similarly, the iterations in the second phase (05d -04e) have a matching surface pattern with rounded corners, making it clear that the same top mold was being used for those iterations.
A short vertical line to the right of the bottom slot is a clear indicator for the iterations in the third phase (05f - 05g).
That line is not evident in the final iteration.
Mold position 8 [1x2]
Mold bottom:
The first 1x2 mold position is not that straight forward. The pattern inside the first stud recess is identical between the first two iterations (05a - 05b). Within the second iteration two variants are identified, where the second variant lacks the mentioned pattern. There are no clear relationship between these two variants in the second iteration (05b) and the third iteration (05c), but from there on a triangular marking above the “E” can be seen across all the following iterations (05c - 05h).
Mold top:
The same top mold was used across the first three iterations (05a - 05c), identifiable by a vertical line to the right of stud 1.
Similarly, the iterations in the second phase (05d - 04e) have a matching mark below stud 2, making it clear that the same top mold was being used for those iterations.
A short vertical line to the left of stud 2 is an indicator for the iterations in the third phase (05f - 05g).
That line is not evident in the final iteration.
Mold position 9 [1x2]
Mold bottom:
The second 1x2 mold position also lacks definitive answers. There are no clear markings inside the bricks from the first three iterations. There are no clear indications that these bricks come from the same mold based on the bottom mold, but from the fourth iteration (05d) one can find a good indicator across all following iterations (05d - 05h) with a short line below the “O”.
Mold top:
The same top mold was probably used across the first three iterations (05a - 05c), identifiable by the stud patterns. The second and third iteration share a much more obvious indicator, with the “K”-shaped mark on stud 1.
Similarly, the iterations in the second phase (05d - 05e) have a matching mark in the top right (05d) / bottom left (05e) corners, making it probable that the same top mold was being used for those iterations.
Even though it’s not very visible, a short vertical line can be seen above the right slot, creating an indicator for the iterations in the third phase (05f - 05g).
Note: No samples found for the final iteration (05h).
Evolution of inside ribs
| Phase | 1 | 2 | 3 | 4 | ||||
|---|---|---|---|---|---|---|---|---|
| Iteration | 05a | 05b | 05c | 05d | 05e | 05f | 05g | 05h |
| 1 (2x4) | Full ribs across, no slots | Full ribs across left/right slot | Full ribs across left/right slot | Full ribs across left/right slot | Full ribs across left/right slot | Full ribs across left slot, no rib across top slot | Full ribs across left slot, and spot-rib across top slot | Full ribs across, and spot-rib from former slot |
| 2 (2x4) | Full rib on slot-less side, spot-rib on each side of slot | Full rib across slot on previously slot-less side, spot-rib on each side of other slot | Full rib across slot on previously slot-less side, spot-rip on each side of other slot | Full rib across slots on each side | Full rib across slots on each side | Full ribs across left slot, no rib across bottom slot | Full ribs across left slot, no rib across bottom slot | Full ribs across |
| 3 (2x4) | Full rib on slot-less side, spot-rib on each side of slot | Full rib across slot on previously slot-less side, spot-rib on each side of other slot | Full rib across slot on previously slot-less side, spot-rib on each side of other slot | Full rib across right slot, and spot-rib across top slot | Full rib across right slot, and spot-rib across top slot | Full ribs across, and spot-rib from former slot | Full ribs across, and spot-rib from former slot | Full ribs across, and spot-rib from former slot |
| 4 (2x4) | Full rib on slot-less side, spot-rib on each side of short-side slot | [No samples - probably no changes from previous iteration] | Full rib across slot on previously slot-less side, spot-rib on each side of other short-side slot | Full rib across right slot, and spot-rib across bottom slot | Full rib across right slot, and spot-rib across bottom slot | Full rib across short-side slots, and spot-rib from former slot | Full rib across short-side slots, and spot-rib from former slot | Full rib across short-side slots, and spot-rib from former slot |
| 5 (2x3) | Full rib on slot-less side, spot-rib on each side of slot | Full rib on slot-less side, spot-rib on each side of slot | Full rib on slot-less side, spot-rib on each side of slot | Full rib across on both sides, also across slot | Full rib across on both sides, also across slot | Full rib across on both sides, also across slot | Full rib across on both sides, also across slot | Full rib across on both sides |
| 6 (2x2) | Full rib on slot-less side, spot-rib on each side of slot | Full rib across slot on previously slot-less side, spot-rib on each side of other slot | Full rib across slot on previously slot-less side, spot-rib on each side of other slot | Full ribs across slots on both sides | Full ribs across slots on both sides | Full ribs across | Full ribs across | Full ribs across |
| 7 (2x2) | Full rib on slot-less side, spot-rib on each side of slot | Full rib on slot-less side, spot-rib on each side of slot | Full rib on slot-less side, spot-rib on each side of slot | Full ribs on both sides + bottom (across slot) | Full ribs on both sides + bottom (across slot) | Full ribs on both sides + bottom (across slot) | Full ribs on both sides + bottom (across slot) | Full ribs on both sides + bottom |
| 8 (1x2) | Full ribs across | Full ribs across | Full ribs across | Full ribs on all sides (across two slots) | Full ribs on all sides (across two slots) | Full ribs on all sides (across two slots) | Full ribs on all sides (across two slots) | Full ribs on all sides |
| 9 (1x2) | Full ribs across | Full ribs across | Full ribs across | Full ribs on all sides (across one slot) | Full ribs on all sides (across one slot) | Full ribs on all sides (across one slot) | Full ribs on all sides (across one slot) | [No samples] |
Phase 1 characteristics:
- The ribs for the original iteration bricks take into account the original slot positions, with no spot-ribs crossing the slots.
- As slot positions changed, the original rib designs were kept unmodified.
- Ribs were only positioned in the short-side inner walls.
Phase 2 characteristics:
- All short-side ribs are full, crossing any slots in the side walls.
- For the 2x4 bricks, spot-ribs are being used to strengthen the walls when slots are created on the long-side walls.
- For the 2x2 and 1x2 bricks, full-length ribs are being used to strengthen the walls when slots are created on the long-side walls.
Phase 3+4 characteristics:
- For all brick sizes, except 2x4, the rib designs are identical to the previous phase.
- For the 2x4-bricks, the initial rib designs are identical to the previous phase, having spot-ribs on slot-less walls (where the previous phase had bricks with slots on the long-side), and missing spot-ribs where long-side walls now had slots.
- A second iteration of the third phase corrected the missing spot-rib for mold position 1 but forgetting to do so for mold position 2 – causing the final fourth phase to have slot-less bricks with long-side spot-rib on three of four mold positions (1, 3 and 4).
Evolution of stud-logos
| Phase | 1 | 2 | 3+4 |
|---|---|---|---|
| 1-4 (2x4) | No logo | Logo | Logo |
| 5-9 | No logo | No logo | Logo |
Accepting that the mold went through an evolution where not all mold positions had stud-logo at some time, was a key factor in establishing the phases and iterations within. One should have expected a more consistent design of bricks, but all the other factors considered trying to identify the mold evolution supports the mixed phase 2.
Modular molds
During the work of mapping the mold evolution, some remarkable observations were made. These observations have given rise to a theory that the mold had some sort of modularity. It is probable that either the top or the bottom part of the mold (or both) had slots where the actual brick-molds could be replaced / changed individually.
Here are the observations supporting this theory:
Bottom mold evolution:
- 2x4-05d-1 => 2x4-05e-1
- 2x4-05d-2 => 2x4-05e-2
Top mold evolution: - 2x4-05d-1 => 2x4-05e-2 [rotated]
- 2x4-05d-2 => 2x4-05e-1 [rotated]
Sample Distribution Charts
Color Distribution
Material Distribution
Origin Distribution